Learn · Claude Code
How to change the terminal font and size in Claude Code
Claude Code runs in your terminal, so its font is your terminal’s font — which is why the Nerd Font icons on your status line show up as empty boxes until you set it right. Here’s how to fix the font and size in every major terminal, and how to skip the config entirely.
Claude Code has no font setting of its own — it inherits the font from the terminal you launch it in. To change it, set your terminal emulator’s font to a Nerd Font (for the status-line glyphs) and adjust its size: iTerm2, Windows Terminal, VS Code and macOS Terminal all expose both. Or run Claude Code inside The Termi Protocol, which adds a built-in per-agent font and size picker with Nerd Fonts, and reflows every terminal live.
Why Claude Code’s font looks wrong
Claude Code is a command-line tool. It draws its interface — the prompt, the diffs, the status line — using whatever font your terminal emulator is configured with. There is no font flag in the CLI and nothing in ~/.claude/settings.json that controls typography. So “changing the Claude Code font” really means changing your terminal’s font.
Two symptoms send people looking for this. The first is empty boxes or blank squares where icons should be — the branch symbol, the folder glyph, the powerline arrows on a custom status line. Those come from a Nerd Font; if your terminal isn’t using one, they render as tofu. The second is simply that the text is too small or too large, which is a plain font-size setting.
Step 1: install a Nerd Font
Nerd Fonts are normal monospace fonts patched with thousands of extra icon glyphs. Download one and install it like any font (double-click on macOS/Windows, or drop it in ~/.local/share/fonts on Linux and run fc-cache -f). Good choices for Claude Code:
- JetBrainsMono Nerd Font — crisp at small sizes, the safe default.
- FiraCode Nerd Font — adds programming ligatures.
- Hack Nerd Font and MesloLGS NF — the classic Powerlevel10k pairing.
- CaskaydiaCove Nerd Font — the Nerd Font build of Cascadia Code.
Step 2: set the font in your terminal
Point your terminal at the Nerd Font you just installed, by its exact name:
iTerm2 (macOS)
Settings → Profiles → Text → Font. Pick e.g. JetBrainsMono Nerd Font. Tick “Use a different font for non-ASCII text” only if you want a separate glyph font.
Windows Terminal
Settings → your profile → Appearance → Font face, or add "font": { "face": "JetBrainsMono Nerd Font" } to the profile in settings.json.
VS Code integrated terminal
Set "terminal.integrated.fontFamily": "JetBrainsMono Nerd Font" in your settings. This is separate from your editor font (editor.fontFamily).
macOS Terminal / GNOME Terminal
Terminal → Settings → Profiles → Text → Font on macOS; Preferences → Profile → Custom font on GNOME.
Changing the font size
Font size lives next to the font in every one of those dialogs. As a quick nudge, most terminals also honor Cmd/Ctrl + + / - to zoom the current window. That zoom is per-session, though; set the size in the profile to make it stick.
The built-in way: a font picker on top of Claude Code
If you’d rather not touch four different config files — or you run several agents and want each terminal consistent — The Termi Protocol puts the setting where you can see it. It runs Claude Code (and Codex, Gemini CLI and others) in a real terminal inside a 3D workspace, and adds a Terminal section to Settings:
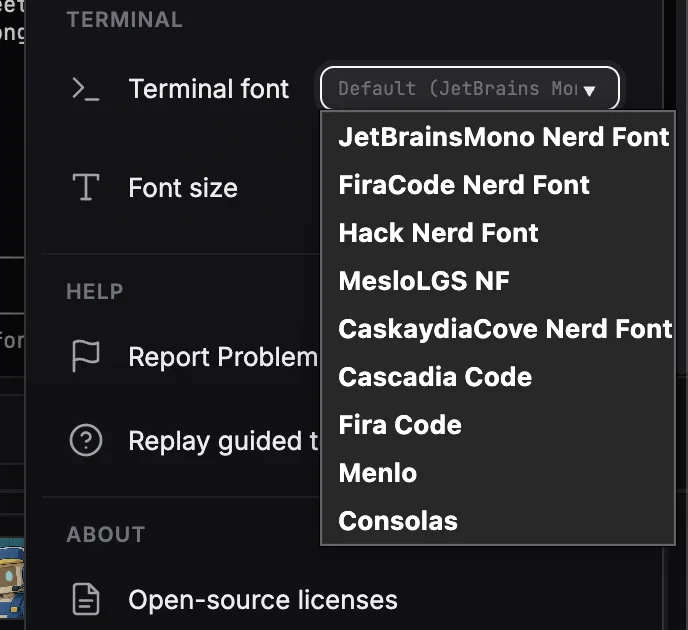
Name a Nerd Font you have installed and its glyphs render immediately, with no restart. It was one of the most-requested tweaks from early users; you can read the before/after on the fixes page. Bring your own keys, watch the agent work in 3D, and keep your status line intact.
Download The Termi Protocol What are AI coding agents?
FAQ
What is the best terminal font for Claude Code?
Any Nerd Font renders Claude Code’s status-line and powerline glyphs correctly. Popular picks are JetBrainsMono Nerd Font, FiraCode Nerd Font, Hack Nerd Font, MesloLGS NF and CaskaydiaCove Nerd Font. JetBrainsMono Nerd Font is a good default: highly legible at small sizes with a complete icon set.
How do I change the font size in Claude Code?
Claude Code renders in whatever terminal you run it in, so the size is your terminal emulator’s setting. In The Termi Protocol, open Settings → Terminal and set Font size from 9 to 24 — every live terminal reflows instantly.
Why are the Nerd Font icons not showing in Claude Code?
Boxes or blank squares mean your terminal font is not a Nerd Font, or the exact font name is wrong. Install a Nerd Font, then select it by its exact name. In The Termi Protocol, type the installed Nerd Font’s name in Settings → Terminal and glyphs render at once.
Can I change the Claude Code terminal font on Windows?
Yes. In Windows Terminal, open Settings → your profile → Appearance → Font face and pick an installed Nerd Font, or set fontFace in settings.json. In The Termi Protocol on Windows, use the built-in Settings → Terminal font picker.
Does Claude Code have a built-in font setting?
No — Claude Code inherits the font from your terminal emulator. The Termi Protocol adds a dedicated per-agent font and size picker on top of Claude Code, with Nerd Font support and a live reflow.